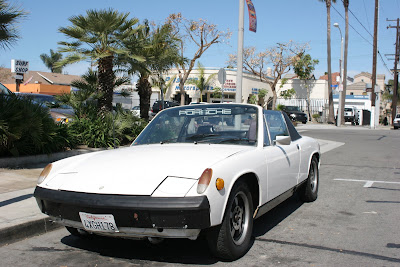
I'm taking the Volkswagen Type-IV motor out of the white 914, to prepare it for the electric conversion. The AC-150 is still in the yellow donor car which I bought from Jorg B., but the white car is in much better condition.
The old motor will be a donor—I'm also working on a type-IV rebuild using a kit from Aircooled Technology. The rebuilt motor will be fitted into my 1970 fastback. Ambitious, you say?
Friday, February 20, 2009
Thursday, November 1, 2007
AC-150 / Porsche 914
Thursday, October 18, 2007
Step 7: Problems with an electric sport car
1. Lack of motor noise
The gas car is too loud, e.g., descending page mill road in 2nd gear. I want volume control.
2. Lack of manual engine braking
In the white car (1.8L fuel-injected 5 speed), 3rd gear is good from about 25 to 50 mph. The top half of the range (4000-6000 RPM) gives hard acceleration and hard engine braking. The bottom half of the range accelerates/brakes slowly. If you're driving around curves with 30 mph signs, 3rd gear is very responsive. If you're driving around curves with 20 mph signs, you want 2nd gear, and so on. Engine braking is more extreme (and louder) in lower gears.
I read the "Interface Document" for my AC-150 Gen 1 electric system. Above 2000 RPM (around 20 mph in 3rd gear), pedal depression below 30% initiates regenerative braking, with stronger braking as pedal depression drops to 0%. A slider on the instrument panel determines the slope of the pedal-response from 0-30%. The slider replaces your transmission for manual engine braking.
Unfamiliar braking is not only un-fun, it's dangerous. Regenerative braking easily surprises new drivers and can cause loss of traction in slippery conditions.
3 Traction control (not a problem)
The AC-150 also includes inputs for traction control. A wheel-speed sensor is installed on each of the non-drive wheels (i.e., the front wheels of a rear-wheel drive car), which supplies rotation speed information to the power electronics unit (PEU). When the speed of the drive wheels is under/over a threshold, determined by the average non-drive wheel speed, the motor enters traction control by attempting to match the RPM of the drive wheels with the non-drive wheels.
4 Transmissions (interlude)
The gear shifter is still connected to the transmission, but the (electric) car has no clutch. The motor is coupled directly to the transmission through an insulating material (b/c the motor shaft, which is made of copper, cannot contact the transmission, which is grounded to the chassis).
The Porsche 914 has a synchronized manual transmission. When you depress the clutch of a manual transmission and shift into neutral, the transmission input (motor) and output (drive) shafts are decoupled. The wheels continue spinning the drive shaft, and with the clutch depressed, the transmission input shaft spins freely. The brass synchronizer gears help engage new gearing as the two shafts spin at different speeds (read more).
5 Ideas for voiding warranty (override traction control)
Without a clutch, shifting into neutral appears the same a loss of traction to the PEU, which will attempt to spin the motor the same speed as the wheels are spinning in the gear it was calibrated for.
With the shifter in neutral, adjust motor speed for the next gear by overriding the traction control inputs?
Friday, October 12, 2007
Step 6: Repeat, Start over
My new AC Propulsion AC-150 motor did not arrive directly from AC Propulsion, Inc. of San Dimas, California, makers of advanced electric automotive drive systems, it was delivered in a parking lot in Mountain View, California, mounted inside a bright yellow Porsche 914.
So the white 1974 Porsche 914 with 4-cylinder 1.8L fuel injected engine bought with the intention of converting to electric was saved once again. The yellow car's AC-150 motor delivers twice the power, the white car has Monza exhaust pipes.
The white car needed brake work and a tune-up. The yellow car has the AC-150 mounted and mated to the transmission. I have a first-generation AC-150 controller, a small box of parts, and an instruction manual. It needs an electrical system, a vehicle-control computer, and at least 28 battery cells (338 volts).
The white car stays AWESOME for getting to work: the direct route (33.2 mi – about 37 mins), through Saratoga via Skyline Drive (81.8 mi – about 1 hour 54 mins), or through San Carlos via PCH (52.2 mi – about 1 hour 17 mins).
I passed through San Carlos for a stop at the House of Wreckers, purveyors of tow trucks and towing accessories, to purchase a set of car dollies. I remarked that I had never seen so many tow trucks. The guys in their shop had never seen a Porsche 914 carting off with four GoJak 6200 car dollies on the way to work (at forty pounds each, these fit two in the trunk, two in the passenger seat).
The car dollies let me put two cars in a one-car garage. The yellow car is still in Mountain View.
Tuesday, August 21, 2007
Re: Brakes!
To replace the front brakes: remove calipers and brake lines; remove hub grease caps, clamping nuts, nose washers, bearings, and brake discs; remove and clean piston retaining plates; align pistons and set the piston retaining plates; tap bearing tracks into new discs; pack the bearings with grease; mount the wheels, nose washers, and clamping nuts (note reverse thread on left side); replace the calipers and brake lines; bleed the brakes.
I expected rebuilt calipers to have the correct piston alignment (for the piston retaining plates to fit), but they did not. I called Larry on this: Larry says he doesn't know why the guy who rebuilds calipers does this, you just have to rotate them. Use a screwdriver and mallet.
Removing the grease caps was difficult. Use the claw end of a hammer.
Step 5 (front brakes) is complete. I washed the car.
Friday, July 27, 2007
Re: Front Brakes
Purchased: two rebuilt front brake calipers ($100/per), front brake pads ($40/set), two front disc rotors ($60/per), two inner bearings ($10/per), two outer bearings ($9/per), two bearing seals ($4/per), one liter superblue brake fluid ($15), one jar wheel bearing grease ($7).
Rich gave me some advice on seating the inner and outer bearing shoes and seal, packing the bearings, dust-caps, etc.
Friday, July 20, 2007
Notes from the mechanic
Car stalls when hot—also difficult to restart
Hotter is harder!
Found engine running ultra lean when cold.
@ warm up—stalled. Adjusted A/F meter wiper (*)
Check valve adjustments
all valves tight zero clearance
(*) To enrichen mixture—set timing & CO.
Many air leaks in intake system!
--
2 valve cover gaskets
1 oil cap seal
1 oil cap O-ring
2 feet 9mm hose
--
@ $125/hr * 2.75 hrs
+ $16.80 (parts)
+ $1.36 (sales tax)
+ $3 (environmental surcharge)
= $364.93
--
Brakes are soft, unsafe. (They were worse before my recent brake work, pumping the pedal helps.)
Could be: (1) front brake lines (old rubber), (2) front calipers (have leaks), (3) air in the master cylinder from recent brake work.
Note: Haynes manual says, if air enters the master cylinder you must bleed all four wheels. Larry says, if air enters the master cylinder you must bleed the master cylinder. There are no bleed valves on the master cylinder, you have to disconnect brake lines directly from the cylinder.
Clutch cable needs adjustment.
--
Now I can start the car easily, hot or cold. Still stalls occasionally when hot (probably due to vacuum leaks), but much better than before. AWESOME.
Somehow between starting the brake/fuel-line work and taking it in to HPH, the tachometer decided to start working. Cool.
Rich suggests re-checking the valve-clearances in 500 miles (because the clearance was zero, adjustments will need rechecking); the speed-o-meter and odometer still do not work.
Still smells like coffee and sour milk.
Thursday, July 12, 2007
Step 4: Get a cup holder
Ways to spend five dollars:
Drive 4 blocks to the coffee shop.
Circle the block.
Park on Shotwell St.
(Two winos admire the car.)
Buy $3.25 coffee at Philz .
Tip the flirty barista $0.75.
Winos ask for $2, give them $1.
Drive 3 blocks back.
Spill coffee.
Park car.
Step 4: Get a cup holder (and clean the carpet).
Drive 4 blocks to the coffee shop.
Circle the block.
Park on Shotwell St.
(Two winos admire the car.)
Buy $3.25 coffee at Philz .
Tip the flirty barista $0.75.
Winos ask for $2, give them $1.
Drive 3 blocks back.
Spill coffee.
Park car.
Step 4: Get a cup holder (and clean the carpet).
Saturday, July 7, 2007
Re: Test drive (brakes working)
I flushed the brakes with ATE superblue DOT 4 brake fluid. The Haynes manual reads (ch 8.14),
"1. Bleeding the braking system is not a routine maintenance task, but is necessary if any part of the hydraulic system has been disconnected...
"2. To commence the bleeding operation, first locate the bleed nipples. The rear ones are on the inner side of the calipers...
"6. A second person is needed to operate the brake pedal at your instruction. The pedal should be depressed smartly one full stroke to the floor and allowed to return slowly. This should be repeated until no more bubbles emerge from the tube in the jar. Smart operation of the pedal ensures that the air is forced along the pipe rather than by-passed. Keep a watch on the level of fluid in the reservoir. If it gets too low it will let air into the master cylinder and then you will have to bleed all four wheels...
"8 Repeat the procedure for the left rear, left front and right front wheels, in that order..."
Adjust rear pads to 0.008" before bleeding and again after. I'm glad to have the new 10mm inside-rear adjuster retaining screws, because 4mm hex wrenches are difficult to find in the right length (to pass through the trailing-arm access hole but not hit the exhaust pipe on the other side) and because as Larry at HPH says, "brake adjusters are worth their weight in gold". Probably exaggeration, but that's why they sell rebuilt calipers w/o adjusters and I can easily see losing one as you retract the adjuster. Reinstall pad retaining springs ("anti-rattle springs"). Double check brake lines for leaks. Thanks to Neal for the smart pedal work, the brakes are bled and feel mighty good. Thanks to the guys at Workingman's Headquarters for the used tools (second set of jack stands: $15, finding the proper flare-nut wrenches in stock: $_).
(26th St, Bryant St, Precita Ave, Alabama St, Bernal Heights Blvd, Folsom St, Precita Ave, Alabama St, 26th St.)
Still AWESOME. Still stalls when the engine is hot, so a cross-town drive is difficult.
(26th St, Florida St, So Van Ness, 15th St, Divisadero St, Oak St, park, Octavia St, US 101 South, Cesar Chavez St, Alabama St, 26th St.)
Good thing, the parking brake now works. Step 2 is complete.
Friday, July 6, 2007
Re: Engine starts
I cut back two inches of the cracked plastic fuel-supply line. It was listed as a $20 part but they're no longer available and Rich at HPH says that this is the usual method, adding "the plastic hoses are normally very durable."
Turn. Squeek. Turn. Squeek. Vroom!
Step 3 is complete.
Turn. Squeek. Turn. Squeek. Vroom!
Step 3 is complete.
Saturday, June 30, 2007
Re: More fuel-line work
I reinstalled the fuel-pump, filter, and rubber hose assembly, poured in a half-gallon of gas, reconnected the battery, and tried starting the engine. Turn. Squeek. Turn. Squeek. Smell gasoline.
The plastic fuel line between the fuel pump and the engine is cracked and leaking fuel at 28 psi. The engine would not start.
Thursday, June 28, 2007
Re: Fuel hoses and clamps
Under the right rear of the car, above the heat-exchanger and hot-air supply ducting sits a Bosch fuel pump with three hose attachments (in, out, return). My 1974 Porsche 914 (the last year without a catalytic converter) has Bosch L-Jetronic fuel injection, uses 7mm inner-diameter hose, except for a special two-diameter hose which reduces the fuel supply line from 11mm to 7mm (at the fuel filter).
Because of the unusual OEM part, whoever last replaced the fuel hoses had changed everything around. There was a different tee in the return line, and two hose diameters. One of the return hoses was original, everything was badly deteriorated.
Parts needed: 3 feet 7mm fuel hose ($6/per), one OEM 99918002950 part ($30), 12 clamps ($1.50/per), 1 7mm tee (free), 1 new fuel filter ($36). Rich sold me the "high-quality", swedish-manufactured clamps (which don't pinch the rubber, but are really difficult to fit). Larry gave me the tee for free (Rich wasn't there, don't tell).
Remove the fuel pump first. This was made easier for me, because my car was missing its right-side flexible aluminum duct, which connects the hot-air supply to the exhaust-heat exchanger. Larry suggests finding an appropriately-sized cap (e.g., from a can of brake cleaner or hair spray) and clamp it on. Without this duct engine fumes can enter the cabin, he says.
Time estimate: 4-5 hours.
Wednesday, June 20, 2007
Step 3: Fuel line repair
Yes, I am repairing fuel lines on a future electric car, but this has to be done because the sound recording (step 1) is not yet complete. I needed to repair the rear brakes (step 2) first because driving was unsafe, and now I need to replace some fuel lines because they were "impacted" by the brake work.
Problem: as I was wrenching and prying around with the right-rear brake-line clip, I broke a fuel line. Gasoline is dripping onto the floor from somewhere between the fuel pump and the fuel filter.
This was really not fun. I placed an open gas can underneath the drip and left my garage door partly open to vent overnight. I needed to drain the gas tank before I could replace the fuel lines.
Tools applied: 1 gas mask, 2.5 gallon gas can, something to plug the fuel-supply line (e.g., a 21/64" drill bit) after you've cut the hose, lots of disposable gloves, and another car ready to accept more than 10 gallons of gasoline.
Tuesday, June 19, 2007
Re: Rear Brakes
Task: replace Porsche 914 rear brakes, including rebuilt calipers ($300/per), new pads ($60/set), new stainless-steel flexible brake lines ($90/set), and new rotors ($60/per).
Tools needed: 11mm flare-nut wrench for the brake-line connectors, 19mm open-end wrench for the caliper retaining bolts, 17mm flare-nut wrench for the original flexible-line connectors (my replacements were standard 11/16), 6mm hex wrench for the old caliper plugs, 10mm socket wrench for the new caliper plugs
I paid a little extra to buy parts from HPH in Redwood City so I can drop in and ask questions. The chief mechanic Larry has answers, but when I ask about removing the rear brake lines, "oh, those are the hard ones." True.
Problem: the flexible line is connected to the frame by two clips, which pin the metal/flex connection to the body. The lower clip is fully exposed, but the upper clip is buried underneath the chassis, above the heating duct, motor mount, emergency brake cable, and fuel pump (right) or master brake cylinder (left). Larry's answer, do it with a small vice-grip pliers and/or a screwdriver and/or whatever works. After many attempts, I got it: attach the pliers and rotate the clip about 30 degrees, use the screwdriver to pry it loose. After you get the clip out, pull the metal line down several inches so you can get the wrenches in.
Putting the clips back in is another challenge. Larry's answer was again, "whatever works". He showed me an arm-length pry bar and hammer, "and, put a little grease on the clip so it'll be easier to remove next time". The grease was key, but Larry has a lift and I have jack stands. You really have to get creative here.
I did all this pulling and prying of clips on the right side first, there was an accident before I could continue (*). It takes about as long to replace each brake line as it does to replace each caliper/rotor/pad assembly.
Time estimate: 8-10 hours (without the final "brake bleeding" step)
(*) Watch out for fuel lines (see next post)!
Thursday, May 24, 2007
Re: Brake Parts
Purchased one rebuilt left-rear brake caliper (without adjuster) and replacement rotors, pads, and stainless-steel brake lines, all to fix the parking brake and improve rear braking performance ($605.93). Still need a 0.008 inch feeler gauge and a lesson in bleeding brakes.
Tuesday, May 15, 2007
Step 2: Fix the brakes
The parking/emergency brake uses cables and actuators, not hydraulics. The left side is broken, has no resistance to tension on the cable, and since the system relies on a tension "equalizer" between left and right side, this effectively breaks the entire system. They call these "emergency" brakes?
The brake pads are nearly exhausted.
I changed the oil.
The brake pads are nearly exhausted.
I changed the oil.
Re: Recording notes
Excerpts from Keith's notes from the first recording session:
- A porsche is a sporting car and has a tendency to slip while performing a high speed turn in a residential neighborhoods. That was totally fun, he doesn't understand that's what traffic circles are for!
- Be prepared to get out and push. If we're positioned facing down a hill, the car will start itself. If we're positioned facing up a hill, the car behind us better get out and push.
Tuesday, May 1, 2007
Re: Ferris Bueller moment
A $4200 buy it now on eBay:
Know where the I-5 meets the Glendale freeway? It's an hour from Long Beach, Dodger stadium traffic included. Mom brought her poodles in case we had trouble at the destination. Arrived and sure enough, the guy has a blue electric 914, up on jack-stands in his driveway. I drive off in a new car I knew very little about.
Traffic sucks in LA. I made it to the 110 and zoomed back to Long Beach. The engine stalled as soon as I pulled off the freeway, but that wasn't the first sign of a problem. He told me the speedometer was intermittent, but it's never worked for me. The tachometer bounces back and forth like a metronome, I suppose you're supposed to read the average value.
The next day I was stuck behind a 2-lane accident on the 405 for nearly two hours, then drove at top speed for about 45 minutes until I smelled oil burning and pulled over, and now I know: the engine won't start or idle when it's hot. This made for a pretty miserable drive. Each time I stopped the car I would have to wait 20 or 30 minutes to start it again. I left the car parked at my office for two weeks, taking joyrides at lunch.
Drove it up the 101 from Mountain View to SF in Friday night traffic, saw one 914 pass me at the 92 interchange, saw one needing roadside assistance at the 280 interchange. I held up a "hang in there" salute, knowing my engine would stall as soon as I pulled off the freeway in another mile.
I skipped Spanish class on Tuesday night so I could work late, but got home in time to pick someone up in front of school after class. Ferris Bueller moment.
- You are bidding on a 1974 Porsche 914 4 cylinder car 1.8 fuel injected engine. I have owned this car for 2 months. I bought the car in order to have it converted to electric propulsion but in the meantime I came across another car that was allready converted into electric which i bought. The car has been a California car all its life and I am the 3rd owner. I was told that the first owner kept it in a garage until 1996. The car starts fine and runs well. The brakes work very well although the hand brake cable will likely need an adjustment. The dash has some cracks typical of the cars of this age and the carpet seems original. The body is straight and the car drives straight. Some minor scratches here and there but no dents. The wheels are aluminum and the tires in descent shape. There is a spare tire and a jack.There is a keyless entry installed in the front trunk but no remotes There are a lot of receipts worth a couple of thousand dollars that came with the car including new clutch, bearings etc. The car is overall in great running condition and it will make a great commuter or can be restored to original with some TLC. I reserve the right to sell the car early as it is being advertised in a local paper. I only drove the car twice and it has been sitting there waiting for its new owner. Please ask questions and check my rating, bid with confidence.
Know where the I-5 meets the Glendale freeway? It's an hour from Long Beach, Dodger stadium traffic included. Mom brought her poodles in case we had trouble at the destination. Arrived and sure enough, the guy has a blue electric 914, up on jack-stands in his driveway. I drive off in a new car I knew very little about.
Traffic sucks in LA. I made it to the 110 and zoomed back to Long Beach. The engine stalled as soon as I pulled off the freeway, but that wasn't the first sign of a problem. He told me the speedometer was intermittent, but it's never worked for me. The tachometer bounces back and forth like a metronome, I suppose you're supposed to read the average value.
The next day I was stuck behind a 2-lane accident on the 405 for nearly two hours, then drove at top speed for about 45 minutes until I smelled oil burning and pulled over, and now I know: the engine won't start or idle when it's hot. This made for a pretty miserable drive. Each time I stopped the car I would have to wait 20 or 30 minutes to start it again. I left the car parked at my office for two weeks, taking joyrides at lunch.
Drove it up the 101 from Mountain View to SF in Friday night traffic, saw one 914 pass me at the 92 interchange, saw one needing roadside assistance at the 280 interchange. I held up a "hang in there" salute, knowing my engine would stall as soon as I pulled off the freeway in another mile.
I skipped Spanish class on Tuesday night so I could work late, but got home in time to pick someone up in front of school after class. Ferris Bueller moment.
Monday, April 23, 2007
Step 1: Electric Lawnmower Project
I always liked this car, waiting at bus stops or wherever in Irvine CA I'd see these Porsche 914s, shiny, driving fast, noisy. Produced 1970-76. I liked the variety: each car has its own color and trim. You'd usually see the driver, because the top comes down and they're practically sitting on the road.
This car is a lot of fun to drive, but its days burning gasoline are limited. The air-cooled 85 horsepower engine and 16 gallon fuel tank are coming out, an electric motor and battery system are going in.
can I drive 35-40 miles to work?
is it still AWESOME to drive?
does it still sound like a LAWNMOWER?
The electric/battery system have more weight and more power. Will it be enough power to be AWESOME, still take corners, and get to work? Those are challenges. The key success metric is actually just this: does it sound good?
Step 1. Record soundtrack. (2 points)
Subscribe to:
Posts (Atom)